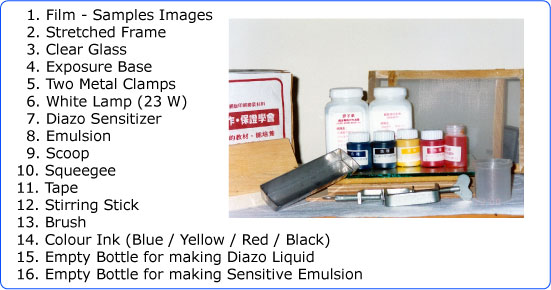
Screen Printing Making Guide-- PreparationThe steps for photo stencil aren't complicated, you just need some simple equipment. In order to do the procedure smoothly, you should prepare the following equipment first. This can help us to do the work smoothly and to avoid mistakes. We have prepared a combo package in which everything is included. For more information please click the button below to find more details.
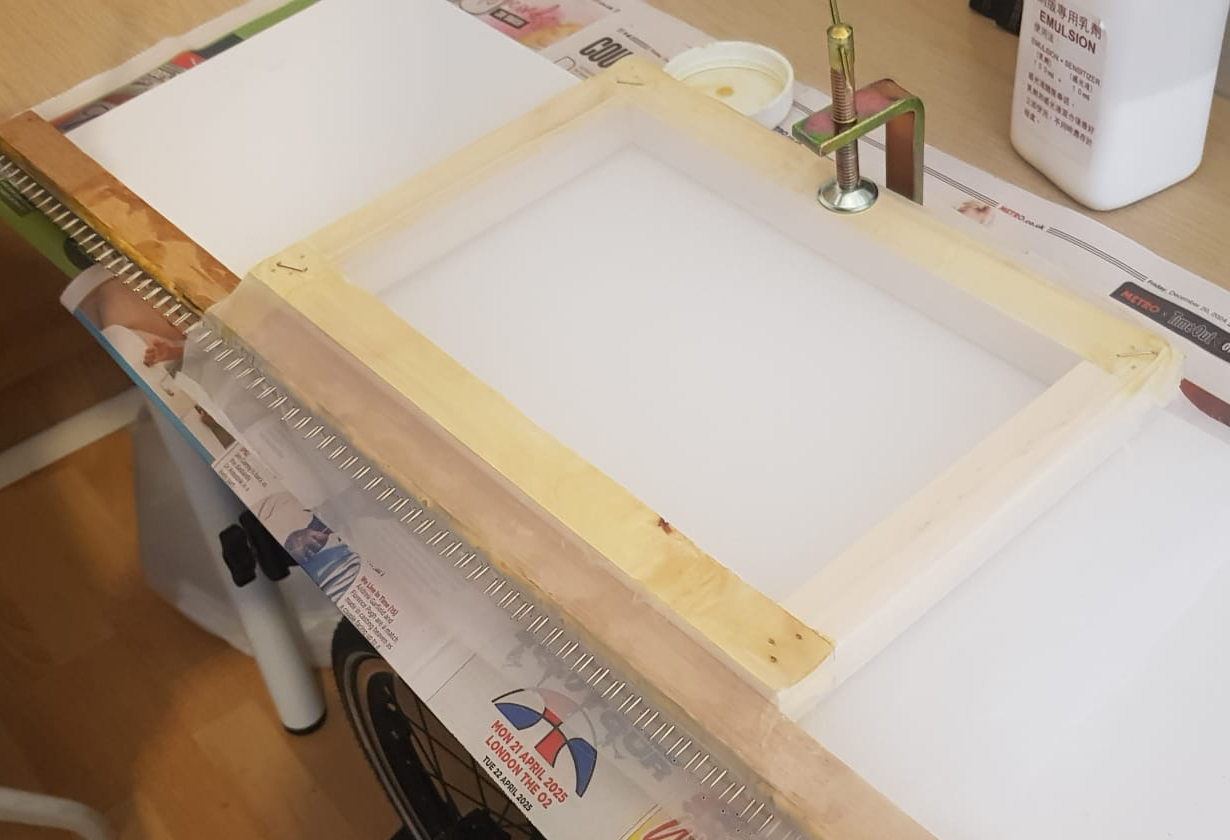
Step 1 Screen stretching (video)The first step is learning how to stretch your screen mesh on the wooden frame or aluminum frame. We should stretch the screen mesh as tight as possible. This can improve the printing quality. If the stretched mesh is too loose, the colour ink may still stay stuck on the screen after you lift up the screen. In our demo video we are using our own custom-made nail bars screen stretcher. If you have this product you can do the stretching job by yourself. And the adhesive glue is also special for screen printing. You can glue the screen mesh on screen frames smooth and cleanly, without mess. We hope you saw the video below and can understand the concept easily. If you want to buy these products, please contact us.
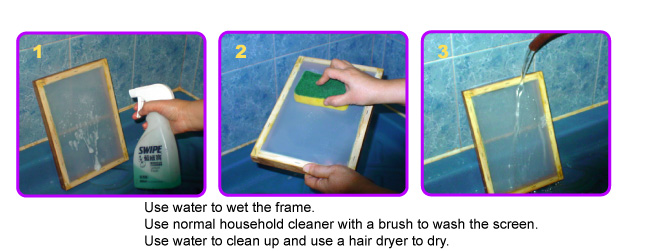
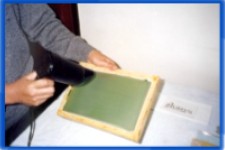
Step 2 Screen cleaning (video)You can store the stretched screen frames for long time before exposure. Not necessary to prepare the stretched screen mesh immediately before the exposure. However before the exposure you should always clean the screen frame first. You can use normal dish cleaner to clean the screen. Then you should use water to wash the screen. Please don't use towel to dry the screen. That will make some lint to stick on the screen. You should lean the screen against a wall vertically. If you are in a rush, you may use the hair drier to dry up the screen.
Step 3 Mixing the sensitive emulsion (video)
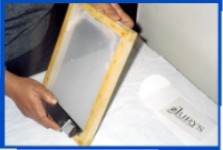
Step 4 Coating the screen (video)The next step is put the mixed emulsion on the screen evenly. To do this job you should have a emulsion coater (scoop). Because we will be coating both sides of the screen, the scoop should be at least 1 inch smaller than the screen frame width. You should pour the emulsion in the scoop and then coat from the bottom to the top evenly. Do this at least 2 times for the both side of the screen. Then you may use hair drier for drying, or you can put a heater in a small room with the coated screen. Then you can dry the screen easily even though it is a big size screen. You can put back the used emulsion in the bottle for using the next time. And you can use water to wash the scoop.
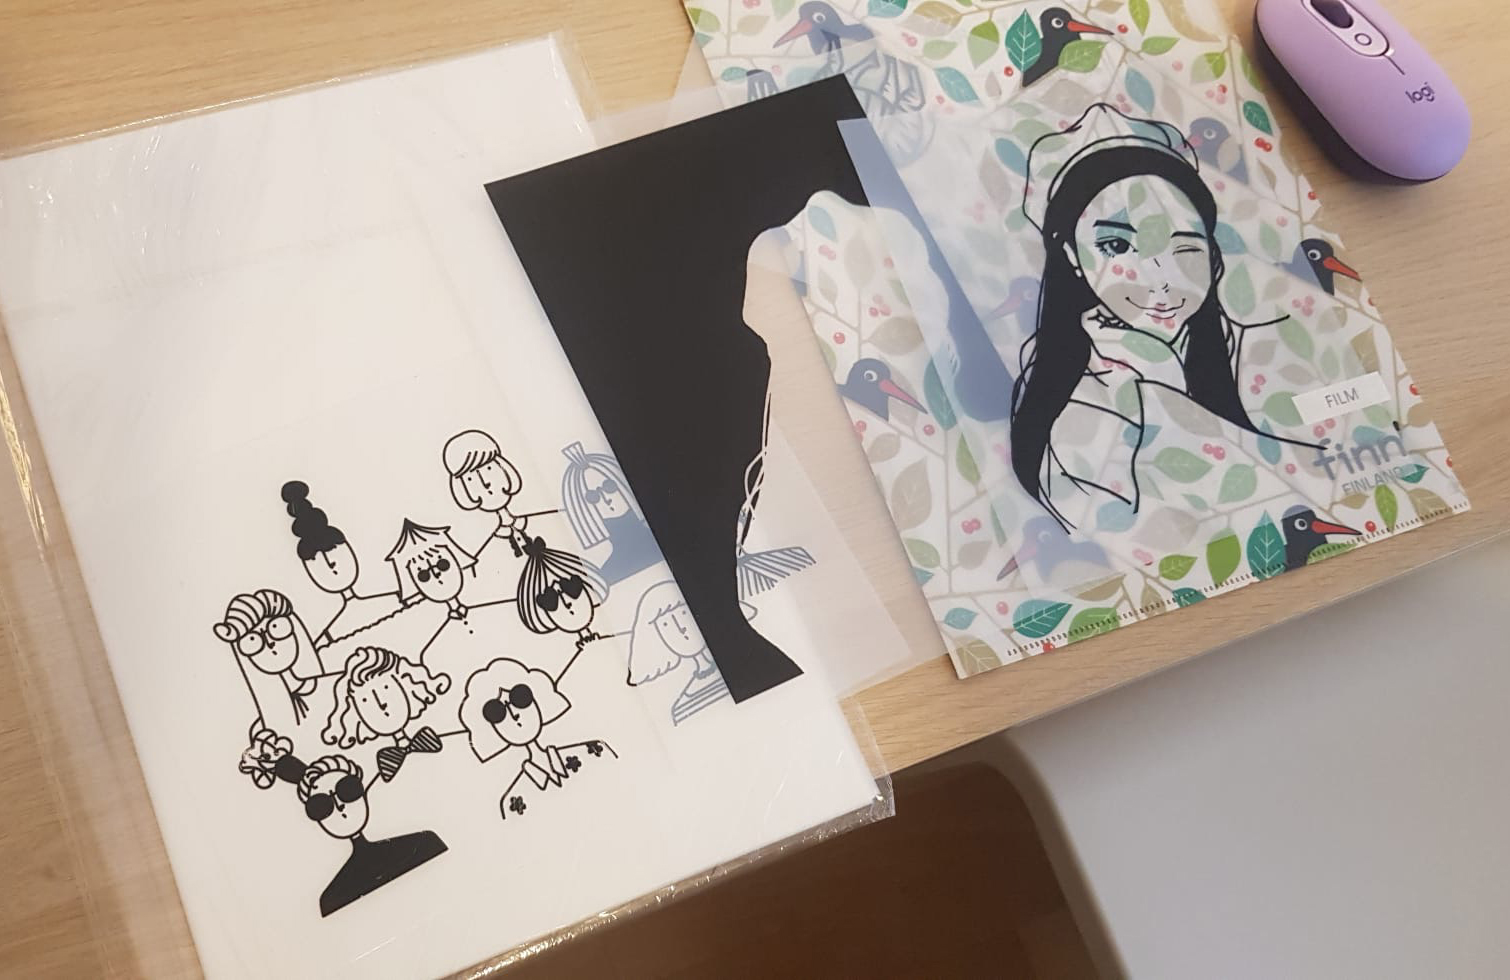
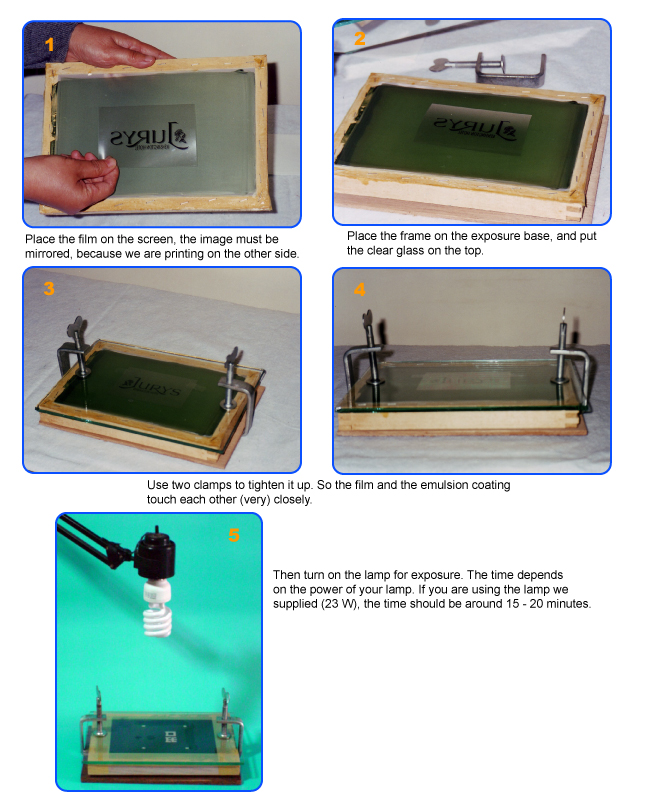
Step 5 Film preparation (video)There is one way to make the image film by yourself. You can print your image by using your own ink jet or laser jet printer. You should set your image on black colour and print on tracing paper. You can buy tracing paper in art supply stores and they are usually used for on pencil sketching. You should print two copies of the same images at the same time. Then cut and paste the two images together, over lapping exactly. That is because we want the image darker. This can make a better result when exposing the screen. If you want to have the best screen making result, you should learn how to output the film. We (and you) cannot do this job by ourselves. You should find a film output company that can do this in your local area. They will have the special equipment to output the film which we cannot have.
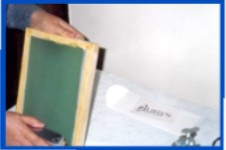
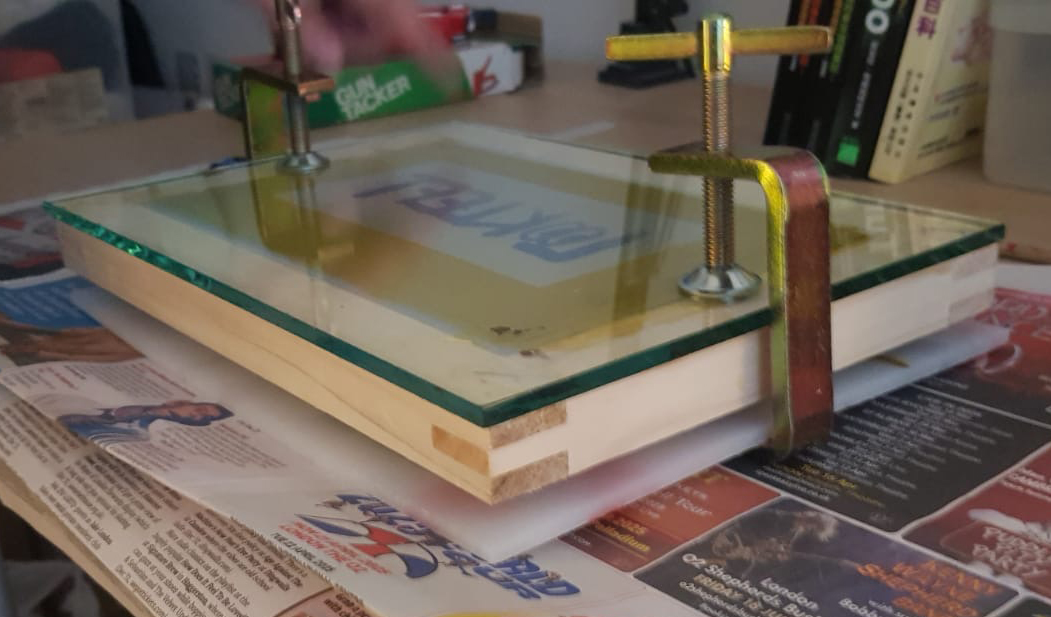
Step 6 Exposure Base (video)The exposure base is made from a wooden board, foam board, glass and clamps. You may make the equipment by yourself. The base size should follow your screen size. Your screen should fit inside the inner foam board. The dimension of the glass and the base wooden board should be same as the outer size (including the width of border) of the screen. For small size screen, using 2 clamps is okay. If your screen is bigger then you should use 4 clamps together. When the emulsion is dried on the screen, then put the screen on the foam board. Then put on the film reversely. Then put on the glass, and use clamps to hold on and press down the glass and the screen. By doing this, the bottom foam board will push up at the same time. This will make the film with the screen surface touch seamlessly. No air or light should go through them. This is a kind of vacuum situation.
Step 7 Sun exposure or using UV lamp (video)Then you should take the clamped screen with the exposure base together to your home balcony or garden. To expose your screen under the sun. We are using the UV ray from the sun light for exposure. On a sunny day, the exposure time is around 3 - 4 minutes. This is very effective. Your screen should face the sun ray angle directly. So in summer noon time, just put your screen on the ground. Besides if you want to expose your screen indoors or at night time, you should have a UV lamp. If you have a big size screen, one UV lamp is also okay. You can move the lamp from one spot to another spot. The exposure time for UV lamp is also around 3 - 4 minutes in each spot. Then you can expose your screen anytime you want. During exposure the lamp and the screen should around 12 inch apart.
Step 8 Screen washing after exposure (video)
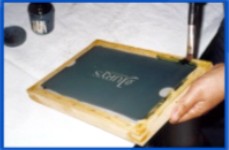
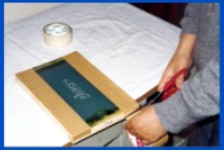
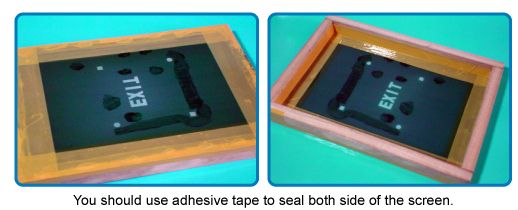
The emulsion will have absorbed the UV light ray, then it will harden and cannot be washed. However we put a transparent film on top of the screen, so the black area of the film blocked the UV light ray, so beneath the film that area of the emulsion will not be exposed. When we spray the screen, that area will be washout. But the transparency area will be hardened by the UV light ray. So now you can understand why we want to paste 2 same printed tracing paper together to make your own film. That is because we want the film image to be darker. Then the image can block the UV light ray more. After the spray you can use towel to dry up the screen. Step 9 Sealing the screen border (video)The next step is using normal carton tape to seal the borders of the 4 sides of the screen. This is a must do step. That is because near the edge of the screen, there are some area which is not coated with the emulsion. If you don't seal the border before starting the screen printing, then the colour may leak out from the edge. The inner sides also have be sealed. Especially if you are using oil based ink or plastel ink for screen printing. That is because this kind of color ink is usually solvent based ink. If the ink touches the glue around the border, then the ink will melt the dried glue which you used for screen stretching. Then the screen will peel off. So we are using the carton tape to seal the inner side also. Then the color ink can be apart from the dried glue. Right now we have made our own screen successfully. If your design is multiple colors. Then you should repeat the previous steps to make other screen stencil images.
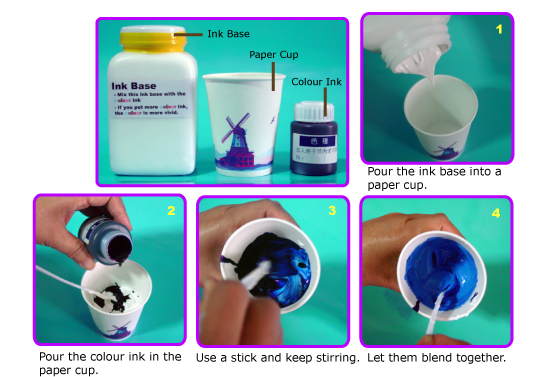
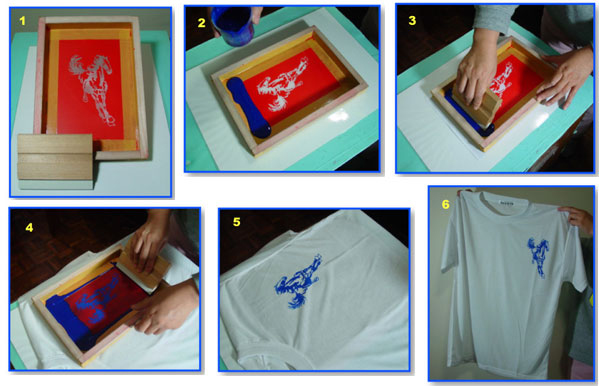
Step 10 Ink Mixing (video)Before printing we have to prepare the ink. We usually mix the colour ink with the ink base to form printing ink. Use an empty paper cup to mix them together. This can save the ink (no wastage). Pour the colour ink and the ink base into a paper cup, then use a stick to mix them together. If you pour in more colour ink the result will darker. However, if less colour ink in used, the outcome will be lighter. When the ink is mixed, you can follow the next step for printing.
Step 11 Printing and cleaning (video 1 / video 2)First put the materials that will be printed under the screen and hold it firmly. Then pour the ink on the screen and use a squeegee to push the ink from one side to the other. Sometimes you have to print twice, that depends on what material you are going to print. We have some printing platform to help you on screen printing. Please go to our product list page. You can find more information and videos there. After printing, if you have used water based ink, you can use water to clean the frame directly. However, if the ink is oil based you have to use the solvent for cleaning. The screen should be cleaned immediately after use. This enables the frame to be used again or for printing a different colour. Water based-ink is usually printed on cotton and oil based ink is usually printed on plastic, nylon or paper.
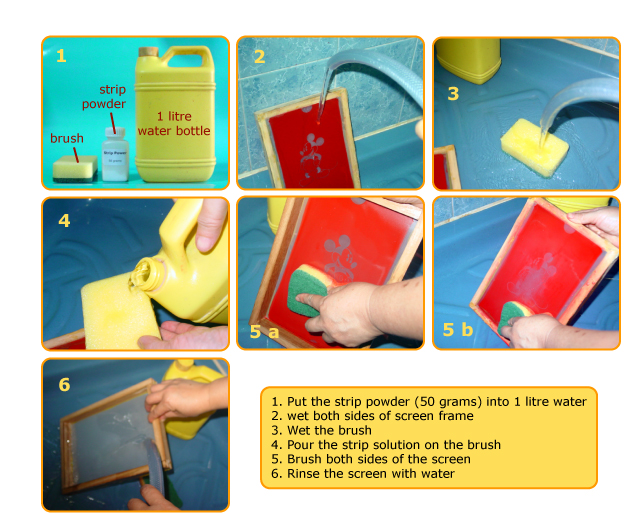
Step 12 Using the Strip Powder (video)It is possible to wash out the exposed emulsion. Then you can re-use the screen for your new design. To do this you should have a product named strip powder. It is usually comes in powder form. You should dissolve the powder with tap water and store in a water bottle. Then you can use this solution along the way. Not necessary to use all of it in one time. You should use hose water to wet the screen first. Then pour the dissolved solution on a brush, and then brush both sides of the screen. By this way the emulsion will wash out. Finally use water to clean everything.
|
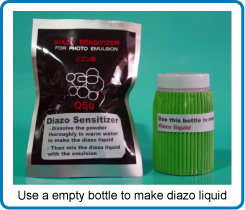 Before the exposure we should prepare the light sensitive emulsion. This emulsion is mixed from white emulsion and diazo liquid. This mixing job is always mixed by yourself. That is because after mixing you can only keep for 2 weeks to 1 month. So you don't need to mix the whole bottle at one time. The mixing ratio is 10 parts emulsion : 1 part diazo liquid (approximate is okay). Moreover the diazo sensitizer always comes in powder from. You should use warm water to dissolve the powder first. So before you are going to mixing the sensitive emulsion, you should prepare two opaque empty bottles. One for dissolving the diazo powder and one for the emulsion mixing. The mixed emulsion will become dark yellow colour. If you want to keep longer time, you may put the mixed emulsion in the refregiator. Moreover the diazo liquid is light sensitive, so that two empty bottles should be in dark colour, no light can go in. Finally when you are mixing the emulsion, you should be in dim light room, but not necessary in the dark room. When the mixing job is finish close the bottle cap firmly. The mixed emulsion colours are different from manufacturers, no worry about the colours.
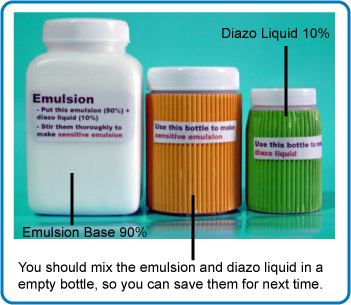


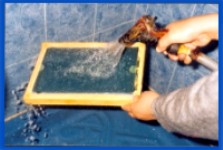 After sun exposure you should take back your screen indoors immediately. Then release the clamps and remove the film from the screen. Then take the exposed screen to restroom immediately and use hose to wet the screen. When the screen is wet, the emulsion will stop further exposure. This is very important. Then we should wait about 3 minutes. Let the un-exposed emulsion area become soft by water. And then use your garden spray to spray the screen on the both sides. The un-exposed emulsion will be washed out. And your designed image can be seen.